

 Čeština
 Dansk
Dansk Nederlands
 Français
 Deutsch
 Ελληνικά
 Magyar
 Italiano
 Polski
 Português
 Română
 Русский
 Español
 Türkçe
How Mt2Guru works, one screen at a time.
Every picture on this page is a real screenshot of Mt2Guru running beside the official Metin2 client, both in English. Mt2Guru itself comes in fifteen languages, and its labels follow the one you set in Settings.
SCREENSHOTS FROM MT2GURU FREE AND PLUS · ENGLISH CLIENT
ON A SMALL SCREEN, SWIPE A SCREENSHOT SIDEWAYS TO SEE ALL OF IT
Getting Started
Start the game in a window, and Mt2Guru docks beside it. There is nothing to link or log in to: Mt2Guru finds the client by itself and reads it the way you do, from the screen.
Mt2Guru has to be in the same language as your Metin2 client. It reads map and item names off the screen, so set the game language on the Settings page before anything else. Settings & Plans
In the game Start Mt2Guru beside the game
- Install Mt2Guru and start it. It runs as administrator, like the Metin2 client itself does, so Windows asks you to allow it.
- Play Metin2 in a window. The companion panel needs room beside the game window, so a windowed client gets the full experience.
- Click into the game. Mt2Guru recognises the client, and its companion panel docks against the right edge of the game window. It moves when the window moves, and steps aside when you switch to something else.
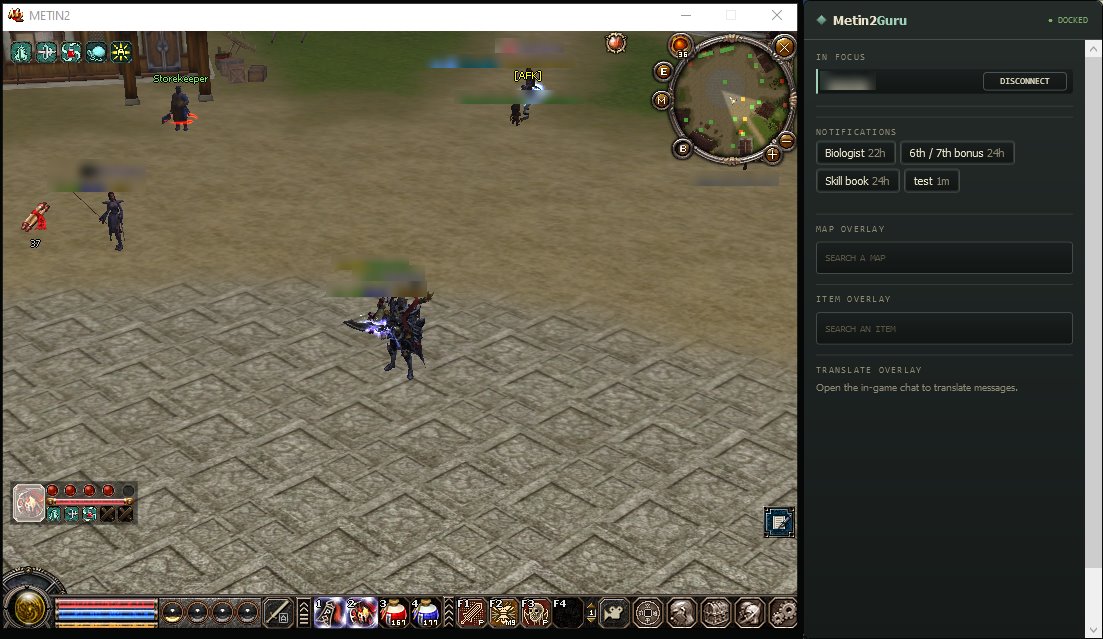
- 1Your Metin2 client, running in a window.
- 2Docked. The panel is attached to that window and follows it.
- 3In focus. The client you are playing, with a button that disconnects it.
- 4Notifications. Your timer shortcuts. One click starts a timer.
- 5Map search. Look up any map or dungeon without opening it in the game.
- 6Item search. Look up any piece of equipment or chest by name.
- 7Translate overlay. Waits for you to open the in-game chat.
Settings Set your game language
- Open Settings in the Mt2Guru window.
- Pick the language your Metin2 client runs in. Mt2Guru reads item and map names off the screen in that language, so the two have to match.

- 1Your client's language. Fifteen languages are supported.
- 2The reminder that Mt2Guru and the client have to match.
Maps & Dungeon Routes
Open your map, and the spawns are already on it. The companion shows the map you have open in the game, with every known metin and boss spawn zone drawn on it.
On / off Switch it on or off
- Open the Overlay page in the Mt2Guru window.
- Map Overlay turns the whole map panel in the companion on or off. Metins, bosses and the map search each have a switch of their own under it.

- 1Map Overlay: the map panel in the companion.
- 2Metins: metin stone spawn zones on the map.
- 3Bosses: boss spawn zones.
- 4Search bar: the map search in the companion.
In the game Open your map
- Open the map in the game. Press M, or the M button beside the minimap.
- Read the spawn zones. Each label gives the level, the name, how many there are on the map and the respawn time: Lv.10 Metin of Combat 2/2 · 30m.
- Need it bigger? The + button opens the map in its own window, with a zoom slider.
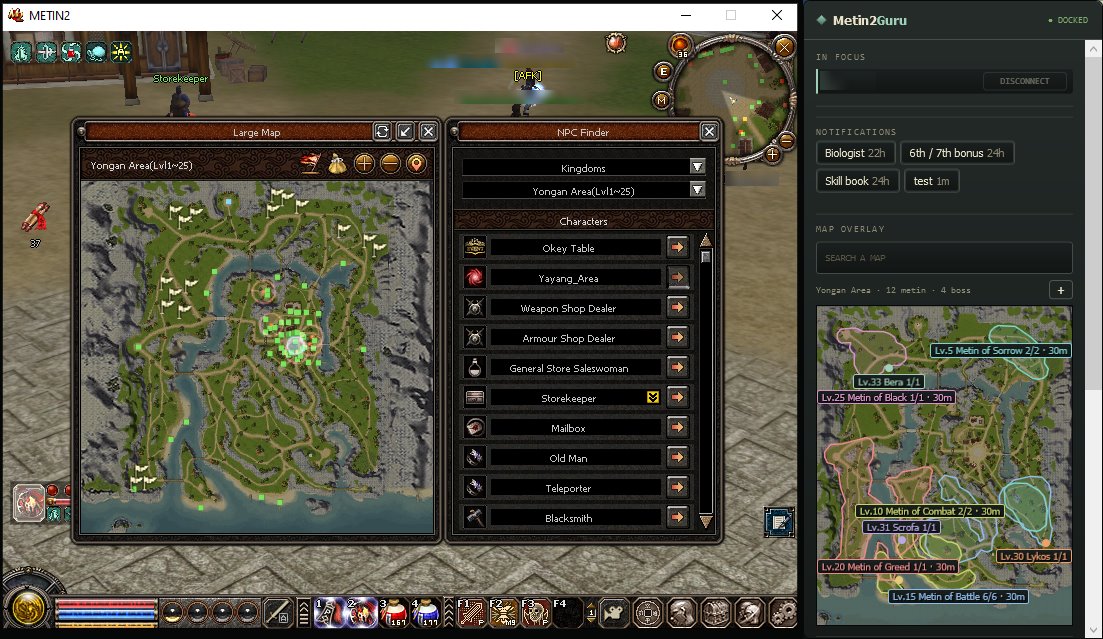
- 1The game's Large Map, opened with M. Mt2Guru recognises which map it is.
- 2The map and what is on it: 12 metin stones and 4 bosses.
- 3A spawn zone, outlined on the map, with its level, name, count and respawn time.
- 4Enlarge opens the map in a window you can zoom and resize.
- 5Map search, for looking at a map you are not on.
Search Look up a map you are not on
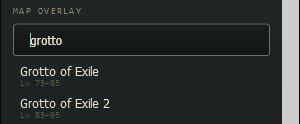
- Type a few letters in the map search. Results show each map's level range.
- Pick a result to pin it. The companion keeps showing that map until you press LIVE, which goes back to following the game.
Dungeons Follow a dungeon route
- Search for the dungeon and pin it. Supported dungeons show their route: numbered rooms, arrows for the way through, and a legend for what each colour leads to.
- Enlarge it to follow the route room by room in its own window.
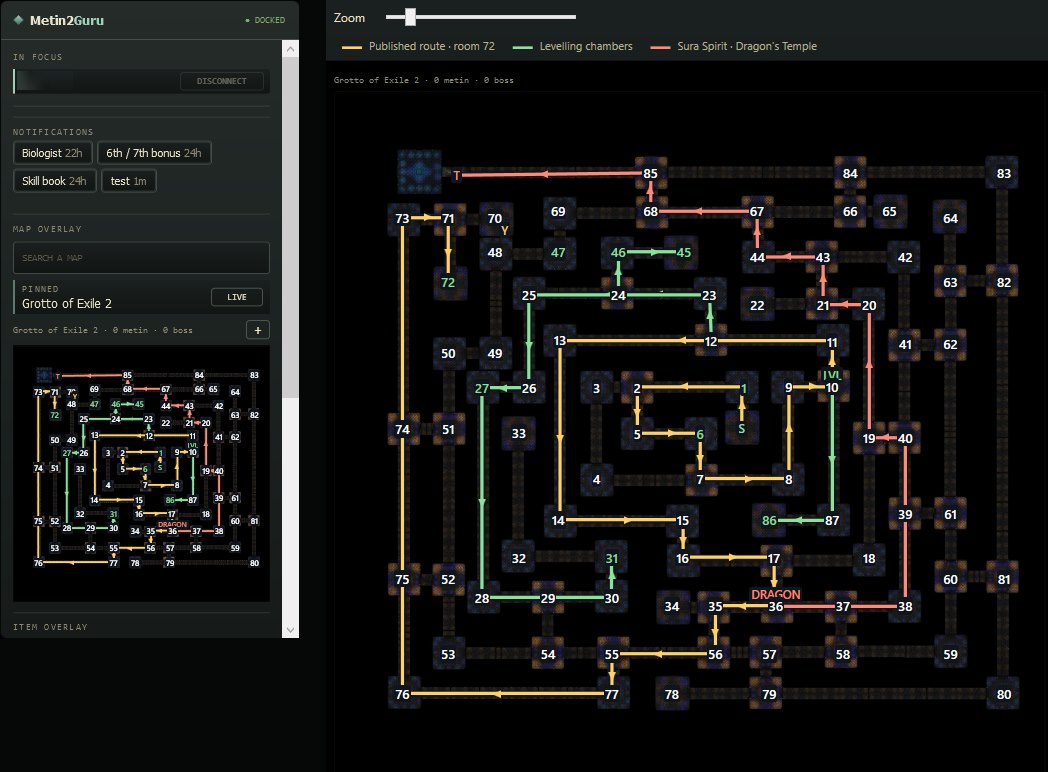
- 1Pinned. The map you picked stays up. LIVE returns to the map you have open in the game.
- 2Enlarge opens the route in its own window.
- 3The legend. Each colour is a route to one objective: the published route, the levelling chambers, and the boss.
- 4S is the entrance. Follow the arrows from there, room by room.
- 5Objectives are named on the room where you find them.
Equipment & Upgrades
Hover an item to see what its next upgrades cost. Before you take anything to the blacksmith, see every remaining step: the chance with each method, the Yang, and the materials.
On / off Switch it on or off
- Open the Overlay page in the Mt2Guru window.
- Item Overlay turns the item panel in the companion on or off, for equipment and chests alike. Equipment is the part that shows upgrade tables.

- 1Item Overlay: the item panel in the companion.
- 2Equipment: upgrade tables for weapons and armour.
- 3Search bar: the item search in the companion.
In the game Hover an item
- Open your inventory or equipment window. Press I.
- Rest the pointer on a piece of equipment. The game draws its tooltip, and Mt2Guru reads the item's name and level from it.
- Read the table in the companion. Move the pointer onto the panel to scroll it: it stays up while you read.
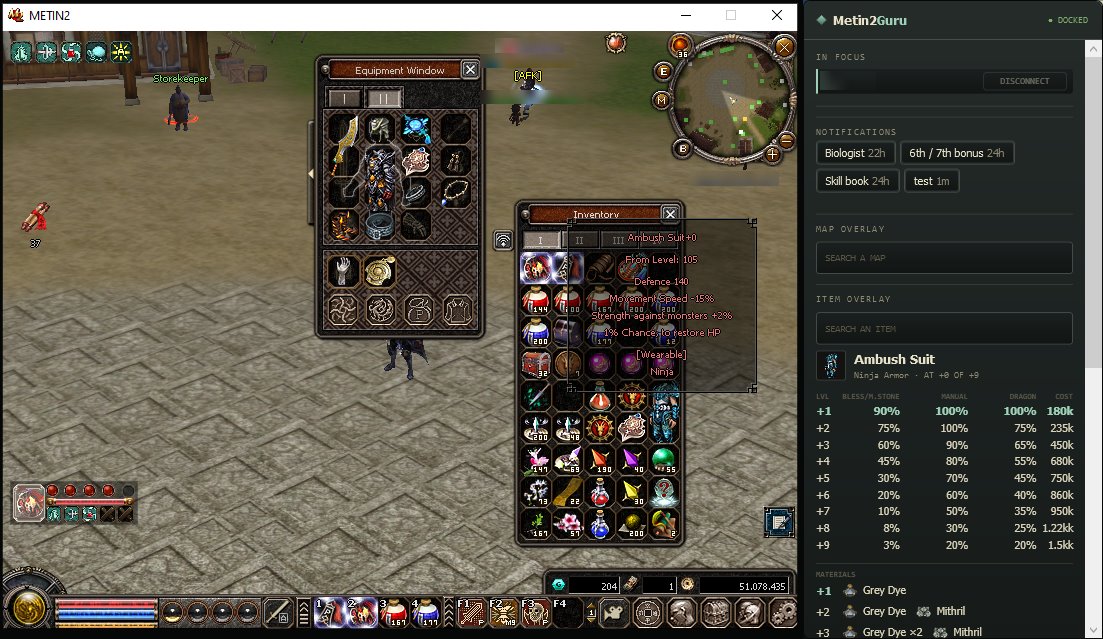
- 1The item under the pointer. Just hover; nothing is clicked.
- 2The game's own tooltip, which is where Mt2Guru reads the name and the +0.
- 3The item, its type and where it stands: at +0 of +9.
- 4Success chance for each step, by method: Blessing Scroll or Magic Stone, manual, and Dragon.
- 5What each step costs, in Yang: from 180k for +1 up to 1.5kk for +9.
- 6Materials each step needs, with quantities.
Search Look it up by name
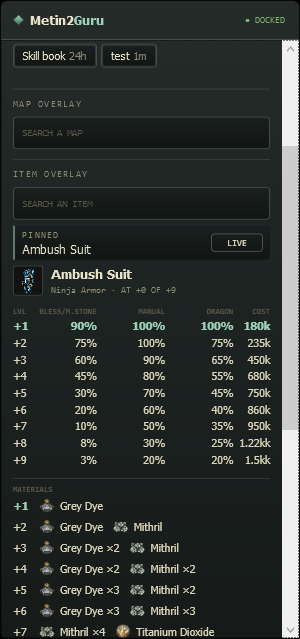
- Type in the item search in the companion. A few letters are enough, in the game language you chose in Settings.
- Pick a result to pin it. Its table stays up while you hover other things, until you press LIVE.
- 1The item search, where ambush was typed.
- 2Pinned, with LIVE to go back to hovering.
- 3The item, its type and where it stands: at +0 of +9.
- 4Every upgrade ahead, with its chance and cost, and the materials under it.
Chests & Item Lookup
Know what is in a chest before you open it. Hover a chest for its published drop table, or look up any chest or item by name.
On / off Switch it on or off
- Open the Overlay page in the Mt2Guru window.
- Item Overlay turns the item panel in the companion on or off. Chests is the part that shows drop tables, and Search bar the item search.
- 1Item Overlay: the item panel in the companion.
- 2Chests: what a chest can drop.
- 3Search bar: the item search in the companion.
In the game Hover a chest
- Rest the pointer on a chest in your inventory, the same way as for equipment.
- Read the drops. Every item it can give, with its rate where one is published. The rarest are in gold.
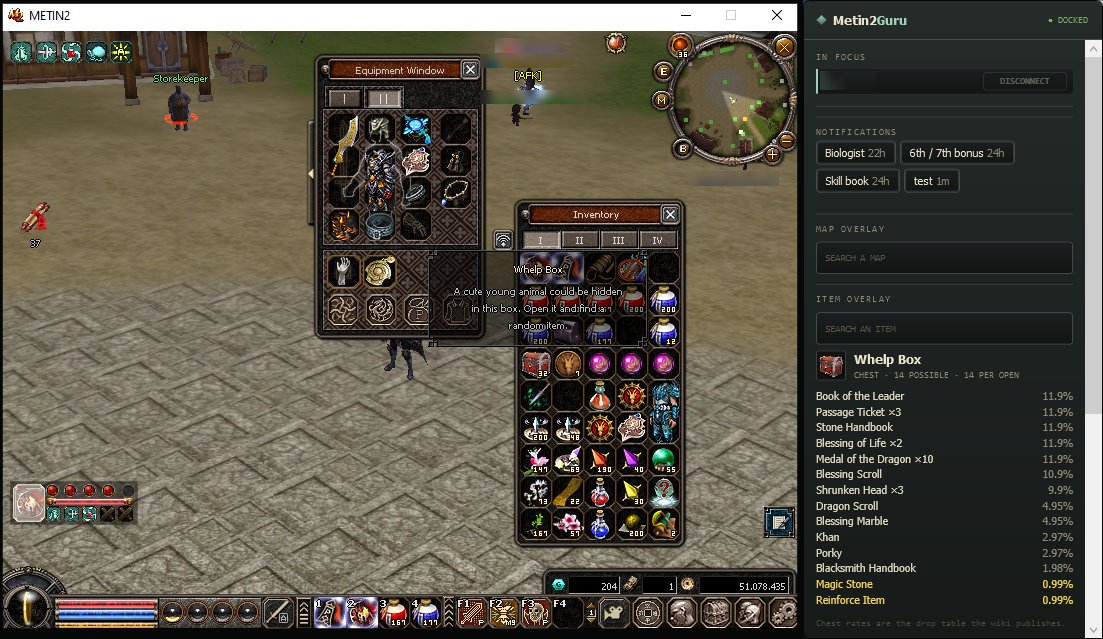
- 1The chest under the pointer.
- 2How many different drops it has, and how many one opening gives.
- 3Each drop, with its chance.
- 4The rare ones, in gold.
- 5Where the rates come from: the drop table the wiki publishes.
Search Look it up by name
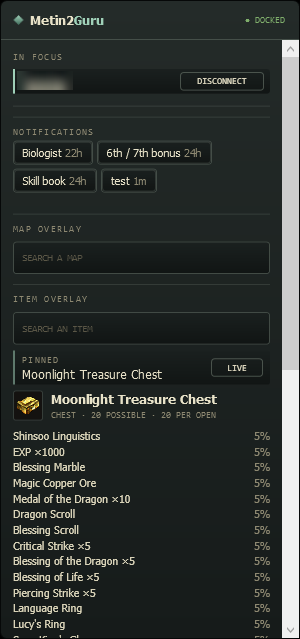
- Type in the item search in the companion. Names are in the game language you chose in Settings.
- Pick a result to pin it. It stays up while you hover other things, until you press LIVE.
- 1The item search, where moonlight was typed.
- 2Pinned, with LIVE to go back to hovering.
- 3The chest: 20 possible drops, 20 per opening, then the table.
Clients & Relog Controls
Every client you have open, and a fast way out and back in. The Dashboard lists each Metin2 client with the character, server and channel it read off that client's screen.
Dashboard Your clients
- Start the game. The client appears on the Dashboard by itself. Bring it to the front once so Mt2Guru can read who is playing on it.
- Disconnect drops that client's game connection, the way players use NetBalancer for a fast logout. The client returns to its login screen.
- Reconnect then takes it back to the same server, channel and character. It uses the mouse and keyboard for a few seconds, so leave them alone until it is done.
- Plus tracks up to eight clients here at once, and disconnects or reconnects the ones you mark together. Free tracks the client you are playing.
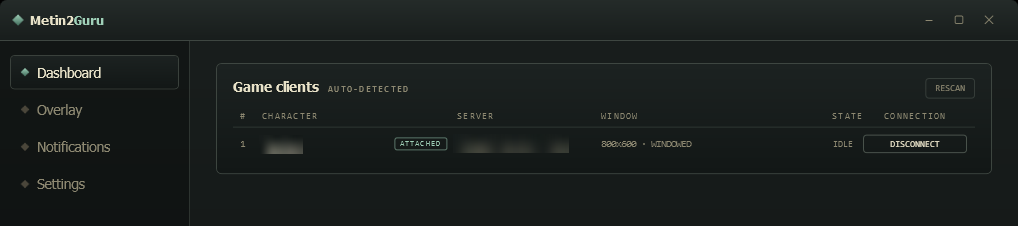
- 1The app's pages: Dashboard, Overlay, Notifications and Settings.
- 2Character, and whether the companion is attached to it.
- 3Server and channel, read from the client's screen.
- 4Window size and mode.
- 5State: in front, idle, minimized, disconnected or reconnecting.
- 6Disconnect, which becomes Reconnect once the client is at its login screen.
- 7Rescan looks for clients again straight away.
Dashboard A row that shows a dash: click the name
- A dash means Mt2Guru has not read that client yet. It reads the character's nameplate and the line under the minimap, so a loading screen, the character list, or a window open over either of them shows as a dash. Disconnect stays greyed out until the server is known.
- Click the name. Every name is a button: it brings that client to the front, and Mt2Guru reads it there. It is also the quickest way to switch between clients, on the Dashboard and in the companion.
- Still a dash? Close the inventory or map covering the nameplate or the corner under the minimap, and the row fills in by itself. Hover the name to see what is missing.
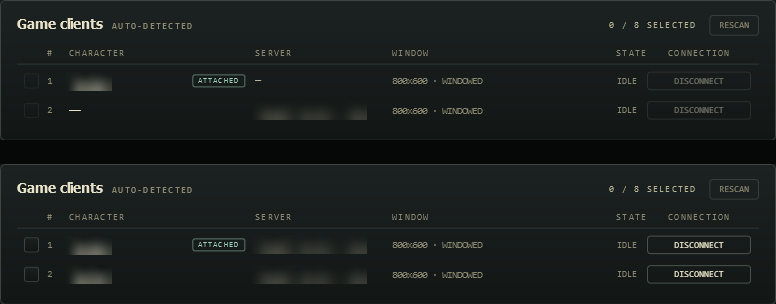
- 1Not read yet, so the character shows as a dash.
- 2Disconnect waits until Mt2Guru knows which server the client is on.
- 3Read: the character and server are filled in.
- 4Disconnect is ready.
Plus Several clients at once
- Tick the clients you want to handle together. Plus tracks up to eight.
- DISCONNECT 2 (the number is how many you ticked) drops all of them at once. Each returns to its login screen.
- RECONNECT 2 takes each one back to its own server, channel and character, one after another. It uses the mouse and keyboard while it works; two clients took about 12 seconds here.
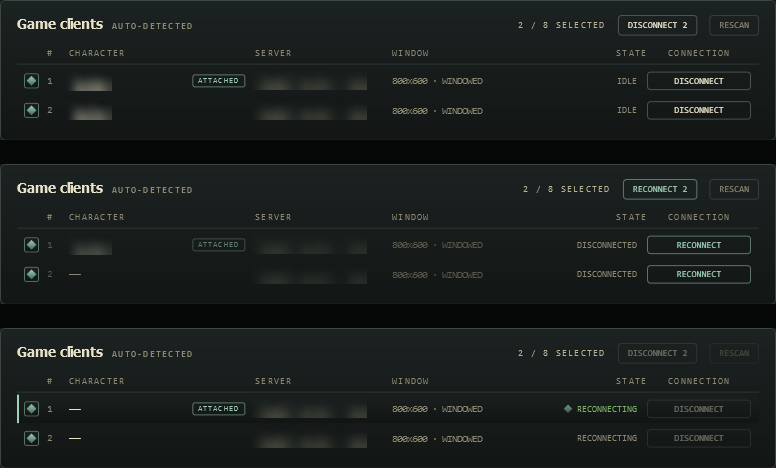
- 1Tick the clients to act on together.
- 2How many are ticked, out of the eight Plus tracks, and the button that drops them all.
- 3Reconnect them all once they are at their login screens.
- 4Each client's state, with its own Reconnect button.
- 5Reconnecting, one client after another.
Companion From beside the game
- The companion lists the ticked clients with a button for all of them, so you do not need to open the Dashboard.
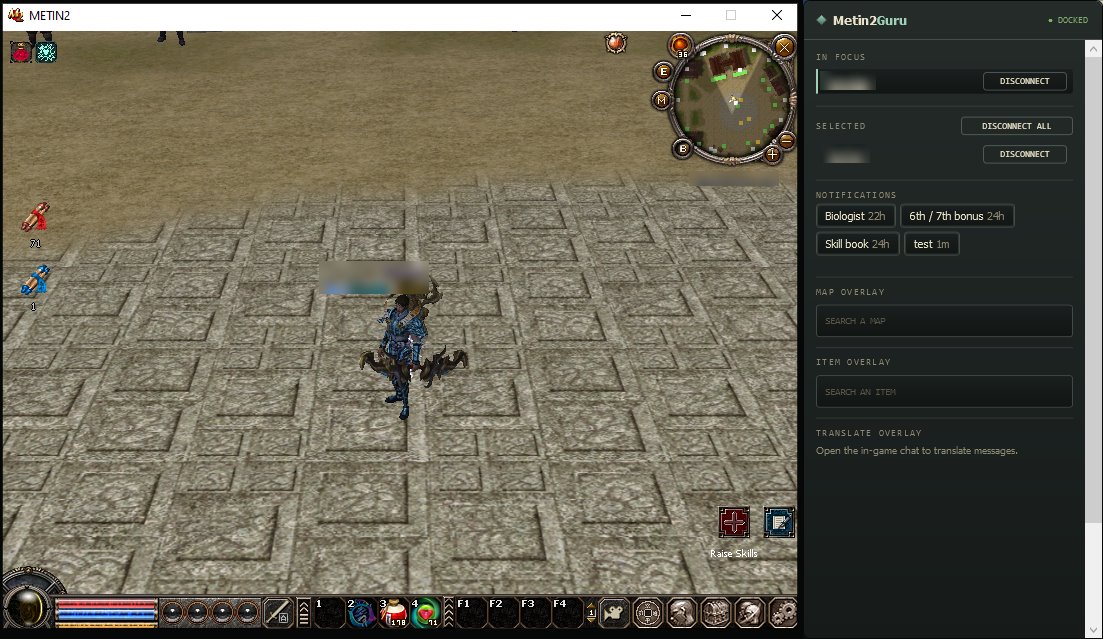
- 1In focus: the client you are playing.
- 2Disconnect all ticked clients, from beside the game. It becomes Reconnect all once they are down.
- 3The other ticked clients. Click a name to switch to that client.
Timers & Client Alerts
Start a timer in one click, and hear about clients that need you. Timers keep running across restarts. Client alerts need no setup at all.
On / off Switch it on or off
- On the Overlay page, Notifications shows or hides the timer shortcuts in the companion.
- On the Notifications page, the switch at the top turns every popup and sound on or off.

- 1Notifications: the timer shortcuts in the companion.
Timers Start a timer
- Click a shortcut, in the companion or on the Notifications page: Biologist, 6th / 7th bonus, Skill book, or one of your own.
- Or make one. Name it, give it a length in m, h or d, and press Start. Add as default keeps it as a shortcut.
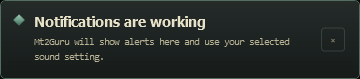
- When it runs out you get a popup and a sound. The popup has Repeat, which starts the same wait again, and Postpone 5m to be told again shortly.
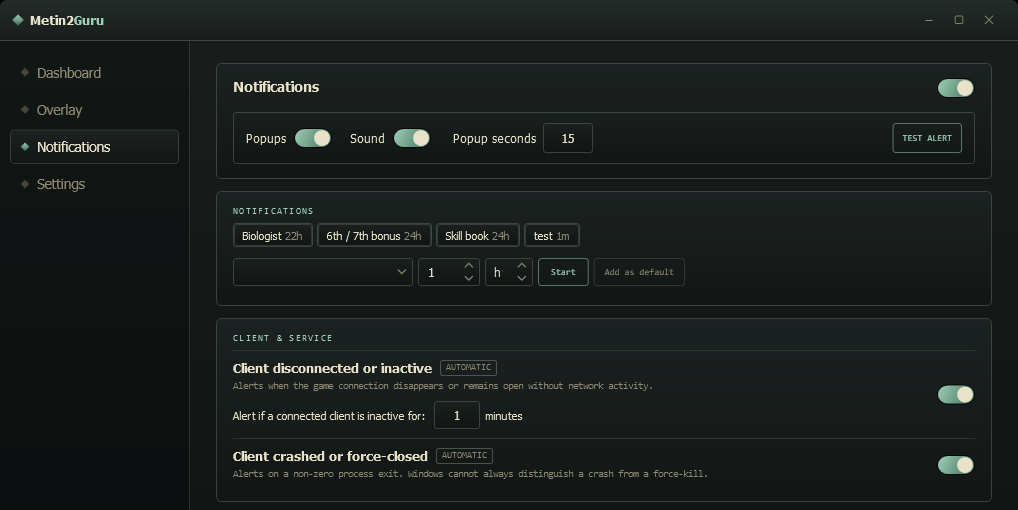
- 1All notifications on or off.
- 2Popups and sound, and how long a popup stays.
- 3Test alert shows a popup and plays the sound now.
- 4Timer shortcuts. Click one to start it.
- 5Your own timer: a name, a length, Start.
- 6Client disconnected or inactive, with how many quiet minutes count as inactive.
- 7Client crashed or force-closed.
Alerts Hear about clients that need you
- Client alerts tell you when a client loses its game connection, sits with no network activity for the minutes you set, or closes unexpectedly. A disconnect you asked for stays silent.
- Test alert on the Notifications page shows a popup and plays the sound, so you know what to listen for.
Chat Translation
Read the chat in your own language. Messages are translated on your PC. Nothing you read is sent anywhere to be translated.
On / off Switch it on or off
- Switch on Translate Overlay on the Overlay page. The first time, Mt2Guru downloads its translation model, about 2.8 GB, once.
- Choose what to translate: the public chat, or private messages, and which language to translate from.
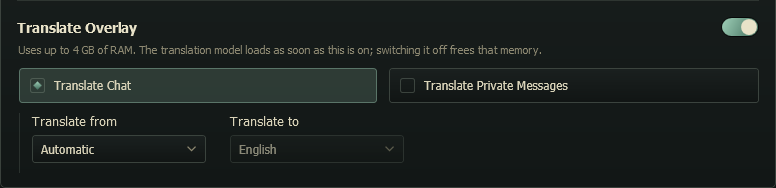
- 1Translate Overlay on or off.
- 2Memory. It uses up to 4 GB while on; switching it off frees it.
- 3What to translate: the public chat, or private messages.
- 4From and to. To is always your game language.
In the game Read the chat
- Open the chat in the game with Enter, or open a private conversation if you chose to translate private messages.
- Read along in the companion. Each message shows who sent it and the language it was written in. Hover a translation to see the original.
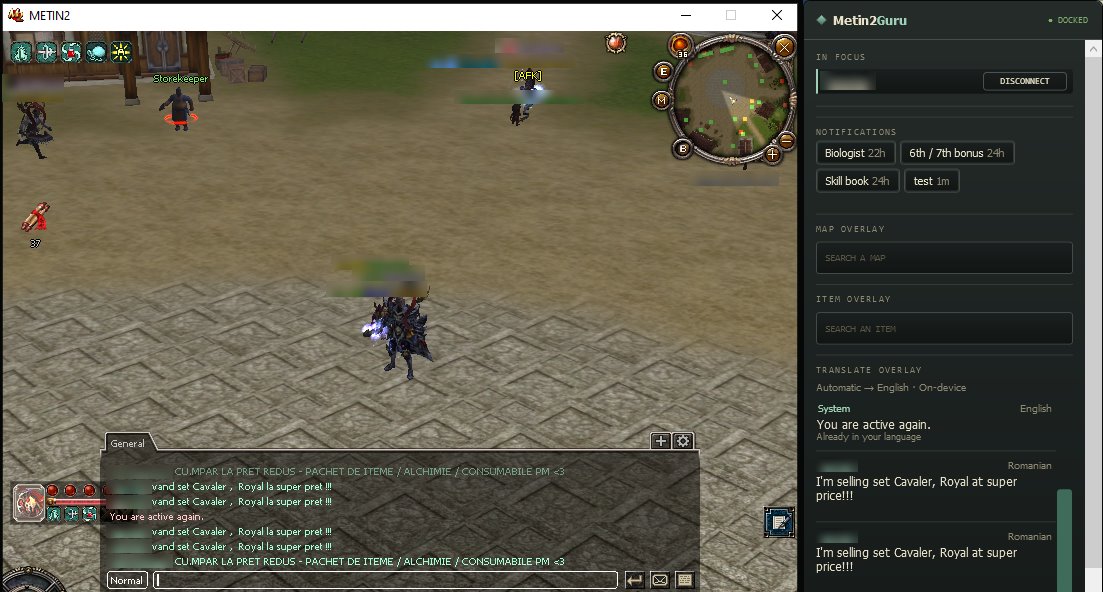
- 1The game's chat, opened with Enter.
- 2From and to. Automatic works out each message's language; On-device means it is translated on your PC.
- 3Already in your language, so shown as it is.
- 4A translated message, with its sender and the language it came in.
Settings & Plans
Your game language, your plan and updates, all on the Settings page.
Settings The Settings page
- Free works with no key. Everything in this guide except tracking several clients at once is in the Free plan.
- After buying Plus, paste the license key under Activate license and press Apply license.
- Check for update looks for a newer release. Show previous versions lets you go back to an older one.
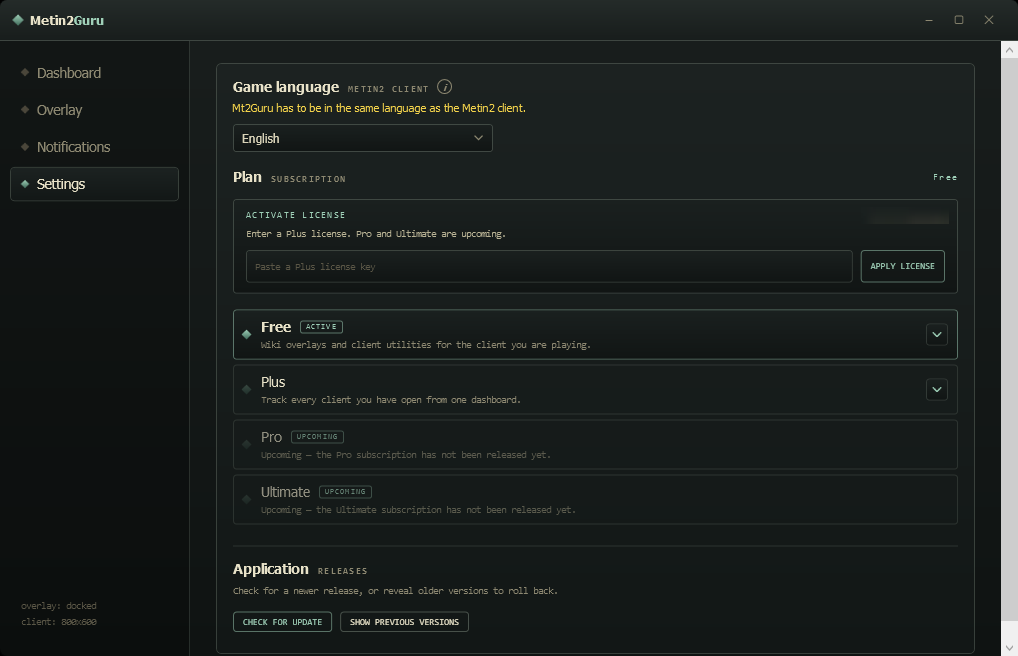
- 1Game language. Set it to the language your Metin2 client runs in. Mt2Guru reads item and map names off the screen in that language.
- 2Your plan. Free works with no key. After buying Plus, paste the license here.
- 3The plans, with the one you are on marked active.
- 4Updates. Check for a newer release.
Ready to try it?
Mt2Guru is free to download, and everything on this page except tracking several clients at once is in the Free plan.